How to make a printed circuit boards
Viewed products
-

How to make printed circuit boards Part 1
Firstly, we are to draw a circuit...
 View larger
How to make printed circuit boards Part 1
Firstly, we are to draw a circuit with a design program. There are many great programs, you just have to browse for them a little on the Internet and see which one fulfils your necessities.
More info
The program we’ll be using is called “Eagle”. It’s a great design program that also has Mac and Linux versions; there is a “light edition” that can be downloaded for free, with size limitations - it can only make 8x8 cm boards.
All designs from this web page are made with that version. It is quite enough at the household level. Therefore, we’ll begin with a prototype made with this program.
Necessary material:
A program for circuit design, in this case, “Eagle”.
A printer, if it’s laser, even better; normal printer also works fine, but later you’ll have to make a photocopy.
Glossy photograph paper (Epson photo quality, 140g/m2 or similar)
A board of a printed circuit (glass fiber), dual layer in this case.
A solvent.
A plastic container where we can put the board and the acid.
A test tube.
110 volumes of oxygenated concentrated water.
Hydrochloric acid solution.
Tap water.
An iron.
One cloth.
Kitchen towel.
A mask.
A pair of gloves.
And... A pin!
Let’s begin.
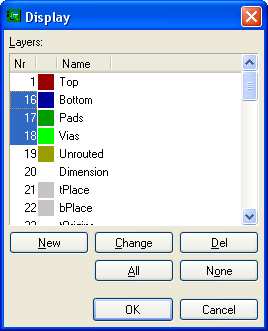
This example has been done with a normal ink printer. Firstly, you have to print both sides of the circuit correctly. In “Eagle”, the bottom parts are marked blue and the top parts are marked red. We shall start with printing the “Bottom” side and then we’ll print the “Top” side. Once we have created a design, we’ll open the display tab, which is in the upper left corner  . A window shows up where we have to activate Bottom Pads and Vias.
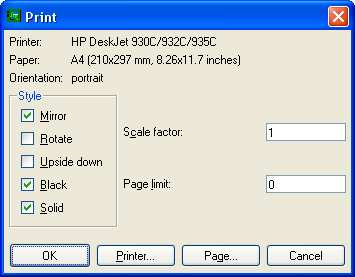
We click on “accept” and then we go to File, Print. A print window appears where we have to choose Solid and Black. The Scale factor should be set up to 1, and the page limit to 0. We’ll adjust the printer so that it prints at optimum quality.

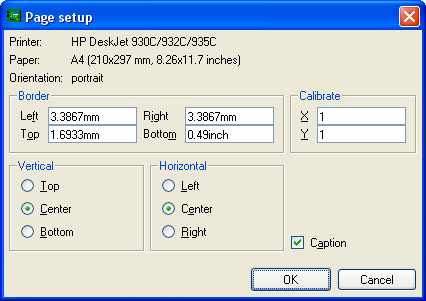
Then we have to press Page... And in the following window we choose top and centre.

We accept and we print. What we have just done was to print a copy of “Bottom” parts in the superior part of our page. Now we have to print “top” parts in the same page but mirrored.
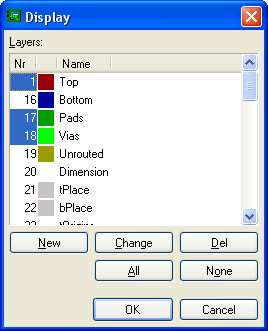
To do this, we click on display  we mark Top and we unmark Bottom.
We accept and we go like before, to File, Print, and we mark Mirror.
Then we click on Page, centre, centre. It should look like this.
Before accepting, don’t forget to put the page where we printed the “Bottom” parts in the printer. Afterwards we have to print again, on a new page, with “Top” parts, but unmarking “Mirror”. Therefore we have:
If we did it with ink printer: 2 pages, one with the Bottom parts and top, the last one is in “Mirror”, and the other page with “Top” parts, in normal vision, without “Mirror”.
If we did it with laser printer: 2 pages, one in the glossy photograph paper (mentioned earlier), with Bottom parts and top, the last one is in “Mirror”. And on the other page will have “Top” parts without “Mirror”.
If we did it with a laser printer we’ll have to make a copy on a photograph paper of the page where we have both sides of the circuit. We have tried this with different paper types and the one that gave best results was Epson photo quality, glossy paper, 140 g/m2; you can also use the one of 194 g/m2